Only trained and qualified professionals should handle these instruments after reading this document.
Overview
Product Description
Simplicity® Dilator perform specialized functions in specific nasal and sinus procedures.
Warning & Precautions
Visually inspect all instruments before each use for damage or deformations in the metal, such as cracks, sharp edges, debris, rust, residue, whistling during vacuuming or broken components. Do not use any damaged or broken instruments.
Use aseptic techniques when opening sterile wrapping.
After use, do not mix contaminated instruments with clean instruments.
Using "Solid" Sinus Dilators
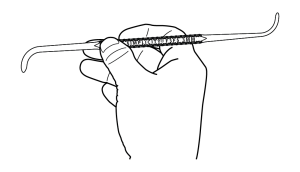
When using the Solid Dilators, hold the dilator in a pen-grip, with the thumb on the flat side, as shown in the figures below. Use the flat side to track the tip orientation when inserted into the sinus. Note: If left-handed, the grip is reversed to accommodate the left hand.
Figure 1
Frontal Solid Dilator
Figure 2
Maxillary Solid Dilator
Figure 3
Sphenoid Solid Dilator
Figure 4
Sphenoid Solid Dilator Insertion
Use the oval depth markings to prevent over-insertion of the Sphenoid Dilator into the sphenoid sinus of the patient, as shown in Figures 3 and 4.
Using "Suction" Sinus Dilators
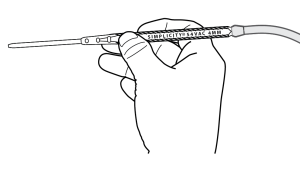
When using the Suction Dilators, hold the dilator in a pen-grip. To create suction hold the thumb over the bypass valve hole on the flat side of the dilator as show in Figures 5 and 6.
Figure 5
Frontal Suction Dilator
Figure 6
Sphenoid Suction Dilator
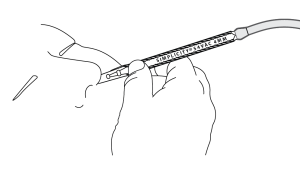
Figure 7
Sphenoid Suction Dilator Insertion
Use the oval depth markings to prevent over-insertion of the Sphenoid Suction Dilator into the sphenoid sinus of the patient, as shown in Figure 7.
Sinus Dilation Video
See for yourself how easy it can be to use Simplicity Sinus Dilators. The following video shows a sinus dilation of the frontal, maxillary, and sphenoid sinuses.
Use the oval depth markings to prevent over-insertion of the Sphenoid Dilator into the sphenoid sinus of the patient, as shown in Figures 3 and 4.
• MADE IN THE USA •
Simplicity ENT Sinus Dilators are made with medical grade stainless steel and built to last!